Image

A Humming Bird

Remember this? I needed to remove the entire hook assembly, and work at the rust. I have to say, I wasn’t sure how this would turn out in the end. There was more rust between the layers than I anticipated. It required several rounds of soaking in kerosene, some scrubbing, then some buffing. I needed to get it to the point that everything could move smoothly and thread wouldn’t get caught on rust or burrs when stitching.

This is a quick video of the first “movement” test. Keep in mind, at this point, the machine has not been oiled.

It’s Alive!!

Once movement on the hook assembly and bobbin case was tested, I cleaned the machine up. I needed to wait until the new belt arrived to continue working on the machine. The original belt was brittle and falling apart due to age. The motor ports didn’t appear to have any lubricant in them, but the carbon brush was surprisingly un-worn. My guess is that piece HAD been replaced at some point in time. I did remove quite a bit of thread that had wrapped around near the belt bushing / cap.

Fast forward to today. The replacement belt, the only non-vintage piece we ended up needing, came in the mail! It was time to oil the machine, lubricate the motor (no lubrication on gears for the white machine), and install the new belt. Now we are getting somewhere!

I was surprised by the noise that the machine made when the belt was not on the motor. I did not take the motor apart to investigate. However, after fully assembling it with the belt, the noise seemed to go away. If I was suspect of anything that might need additional work later, it will be this. However, It could be related to the lack of lubrication that has been in the motor for a long time.

Scary Motor Sounds

Final Adjustments:
– Re-install the belt
– Install the needle
– Wind a bobbin
– Adjust bobbin case tension
– Adjust machine tension
– Polish (because, why not!)

Listen to it hum! I am happy with these results. I managed to repair it with some kerosene, oil, motor lubricant, and a $10.95 part! With a little de-rusting and some general machine care, this machine is brought back to life. I’m sure with regular maintenance and use, she will last a long time.
Now, it needs a name. Doesn’t every good machine?
But, alas, I don’t get to keep her. This belongs to my friend. Hopefully, my friend gives her a great name and if he finds any other orphans at the antique and estate sales, he will keep me in mind!
Featherweights are pretty fun to work on.

Happy Sitching!

Image

Feather Beds Are Over-Rated

Now we get to the meat of the machine.  Some of the most important areas to look at on a machine you want to refurbish / repair are interior mechanics and the exterior bobbin case and hook assembly.  A cosmetic finish can be replaced. But the mechanical components must be functional to make it worth it. A machine can look beautiful on the outside, but be a hot mess inside.  Let’s look inside of this cutie.

After removing the oil drip cover, there is some evidence of rusting, but nothing that concerns me. Those mechanics should clean up well with some kerosene and machine oil.   The part that worried me was the bobbin case and hook area.  There is significant evidence of rust.  The bobbin case was completely seized onto the hook assembly, and the hand wheel and assembly could not move.  This machine wasn’t going anywhere.  Furthermore, the bobbin case lever was “free swinging” and no longer moved the bobbin case slide.  The bobbin case became the first order of business!

First, get it out, carefully.

Second, remove as much rust as possible and try to disassemble it. 

Original, vintage bobbin cases are always best if your machine has one, and can be cleaned up enough to function.  A replacement can cost anywhere between $75 – over $120 depending on if you are after a reproduction or a replacement vintage model.

As luck, and patience, would have it, I was able to use machine oil to gradually get the case to budge.  Normally, you could remove the case with part of the hook assembly, but that was rusted in place too. 

Here are some pics of the bobbin case after extraction and before I was able to get the bobbin removed.  Yes, the bobbin was also stuck in the case. Fun fact.  As I accessed the bobbin and started removing the threads so that I could see better, I took off no less than five different colors of bobbin thread!  Is that a thing, to wind many colors of thread on the same bobbin?  

I mentioned that the slide was seized on the case from rust. After soaking it overnight in kerosene, scrubbing it, leveraging some WD40 and some gentle tiny mallet tapping, I finally removed the slide. To my utter surprise, the tiny spring inside was not rusted out, just surrounded and the slide unable to move.

This story has a happy ending in store I think.


I was able to get the case cleaned up and buffed. I might have to work on the interior more and test out the other spring. However, the slide and lever is now functional again, AND will fit on and off of the hook assembly! This is a very good point to be. The next line of business is the hook assembly itself, another $110 part to replace. Let’s hope we don’t have to do that.

Scorecard so far: Only one part that must be replaced, the belt, and that part is ordered and in the mail!

To be continued…

Image

A Moody White Feather

On Tuesday, a friend, and previous colleague texted and asked me if he could drop off a recent find. Lucky for me, it wasn’t a kitten, and light as a feather!  He was able to purchase it at a reasonable price, but it would need some tune-up and repair (see the picture, complete with mood lighting!). I hope we can get her running!

I couldn’t resist diving right in. The machine is a Singer 221K Featherweight, circa 1964 and manufactured in Great Britain. My mom has one like it and loves that it runs so quiet! Here are some pictures of the machine on arrival. If you are interested in the history of the white machine and how it compares to earlier models, take a look at the Featherweight Shop’s schoolhouse post.

The machine appears to have some chipping and exposure to moister / water damage. The belt is not salvagable. I was surprise at how brittle it was. However, since my friend loves everything vintage, the goal is to recover all of the other original vintage components if possible. The first order of business is to look under the hood and see what the mechanical components and the bobbin case looks like. Just wait until you see what we found!

To be continued…

Image

Just.In.Case

I have been sewing and quilting since the September retreat,  but many of those projects are still in progress!  (I haven’t been quite as frugal with my sewing time, and sleep has been precious! Are those good enough excuses…)

However,  I want to share this wonderful, just IN, case that my Father gifted me for Christmas!  Do you remember the Feathered Journey of the 1937 featherweight?

The case that arrived with it smelled, and looked like it was from 1937.  It has that distinct horse glue mixed with basement storage aroma and was only a little war-torn.   I wonder what its story was in the years of WWII?

I wasn’t feeling brave enough to tackle this one, but my dad thought he would like to have it.  I thought that he might fix it up for my mom’s featherweight.  However,  he surprised me this holiday when he asked me,  “how shall I stain it?”.

Look at the results!  How awesome is this to store and protect my green beauty?
Thank You, DAD!  You never cease to amaze me.


I am not sure of the entire process he followed to refurbish this case, but I talked to him about a few of the steps along the way.   This is how I understood the process;

  1. Painstakingly remove all of the old covering from the box.  Do not remove the riveted clasps, just do your best to remove the covering around them.
  2. Remove the old broken handle.
    It is actually stitched through the lid.   He found that the wood for the lid was not reinforced, which is why many of the old cases were probably cracked from carrying them by the handle.  (I wish I had a photo of it after removal!)
  3. In this case, the handle was not in any condition to save, but it was noted that the handle itself did have a curved steel plate to make it sturdy.
  4. He sanded the inside and outside of the case to remove as much of the old glue as possible.  This gets rid of most of the old smell.
  5. In this case, he stained the box green.  Several coats were required as the old wood (with glue residue) did not soak up the stain like new wood.
  6. He hand sewed a new handle to the box lid.  I think that he added some reinforcement, but I am not positive.  Take a look at that handle.  My dad is the master of upcycling.  So trendy and functional!  🙂

    My dad had an old, sturdy, red leather purse that had some awesome hardware.  He was able to use the leather, hardware, and straps to create a new handle and a strap for the case.   He used some nylon strapping to create a cradle for the box and attached the long handle to that.

    The inside was another story.

  7. The machine was a glove fit to the box, so he covered the bottom, sides, and top with felt so that the machine doesn’t get scratched when lifting and lowering it from the box.

The pedal is too large to fit on the left side of the machine, but I will be able to store the manual or some tools during storage and transport.

8.  Finally, he added a personal touch by hand painting Celtic scrolls to match the silver singer scrollwork on my machine!  Woo Hoo!  It is sew pretty.

Now, as if I wasn’t the luckiest girl in the world already, my mom iced the cake.  She gifted me a handmade “sew-together-bag” in Singer themed fabric to hold all of my tools and spare parts for the machine.  These babies take some patience.  It is beautiful!

I am so grateful to have such talented, loving parents.  These are such wonder.full gifts from the heart and make my machine even more special for my parent’s involvement in the project.  I will never forget.


SEW TOGETHER! 


Image

Sight Unseen

It is nice when the results of a sight unseen risk come out as you expected.  There were some who thought from my earlier photos of my new featherweight project, that the machine looked great the way it is.  However, upon arrival in West Virginia, my suspicions from the poor eBay photographs were corroborated, and then some.   The finish of this 1937 beauty does indeed need some work, and the original decals are at least 1/3 missing.  She is a perfect candidate for a makeover!

True to many auction listings, the possible water damage and extent of decals missing were under described.  It’s not a hot mess, but not very collectible as-is.

This is what the listing said:
“1937 Singer 221 Featherweight Sewing Machine with case and pedal. Very nice condition with wear consistent with age and normal use. Tested and operates perfectly. Bobbin case intact (sometimes they are missing). No other attachments present. Case has wear consistent with being used and moved around. Handle has been taped with electrical tape but is still attached to top strongly. Work light works. Some of the gold trim printing is worn off from use. Belt has minor use wear but still in very good condition. Motor runs freely and strong. I will ship as cheaply as possible.”

IMG_0382.jpg

If she really operates perfectly, then all will be well.  If she doesn’t, then I will fix it.  When I am 80 years old, I can only hope I fare so well!

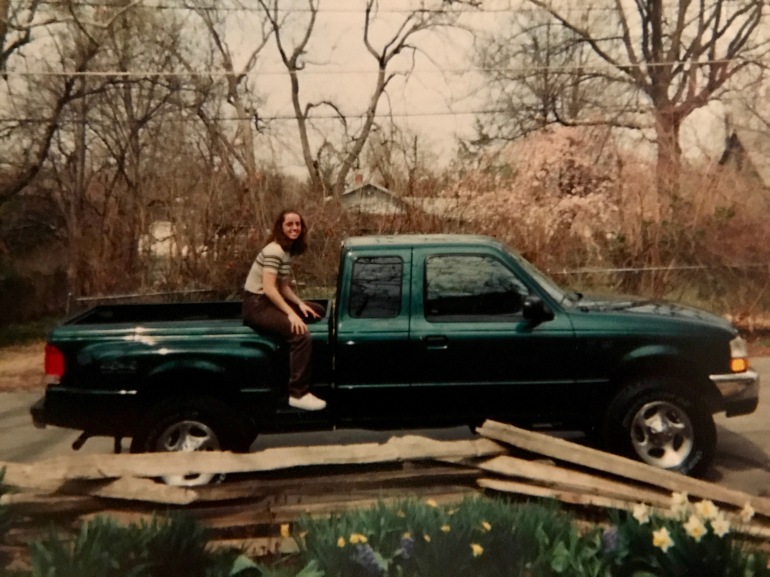
I think she will be out for delivery for stripping, maintenance, and refinishing this week.  My new waterslide metallic decals arrived from keelersales.com and I have decided on a color.  It isn’t exactly a hot rod, but as close as I have ever come!  This 2000 Ford Ranger was my very first “new car”.  Since then I have driven a station wagon and a minivan.  Sigh.  I think that I need to remedy this.   An old curvy Jaguar with silver racing stripes would look great in this metallic green color too! (Hey, a girl can dream…)

IMG_0386.jpg

My brand new truck – Spring 2000 before I graduated from college

I have a picture in my head about what the 1937 will look like all decked out in green metallic with silver Celtic knot decals and all of her original shiny chrome.

But, what shall I name her?

If I’m lucky I will ger her back before June when I attend the Kansas City Regional Quilt Festival.  (If not, I’ll borrow Mom’s machine and treat it to a spa day.)  I signed up for a Nova Montgomery Singer Featherweight Maintenance Class.  I thought this would be great to guide me through maintenance of the machines, help me maintain my machines health and be a great resource for my mother, friends, and family who own these machines.

The tulips in this photo give promise of spring, though winter won’t be over until March 20th here!  Our biggest snow might be yet to come! My ankle is doing really well, so…

LET IT SNOW!

Image

A Feathered Journey Begins

My new toy is traveling today!

Funny story anyone?

My fun friend Teresa, who I met at Quilting Elevated last year, was going to bid on a featherweight at an auction in West Virginia last Sunday.  She is an auctioneer and knows how auctions work.  I felt good about letting her spend my money.   Saturday night I get a call… ” I bought you a machine! (I hope you’re not mad…)”.  Now, I was momentarily confused since the auction wasn’t until Sunday.   However, never underestimate a friend.  I had mentioned the type of the machine I was most interested in and given her bidding limit guidelines.  She ran with it and probably saved me some dough ( and a very long drive for her) by finding said model on an Ebay auction without a 10% buyers fee.   So far so good.  We have a tracking number!

s-l1600 (1).jpg

This 1937 beauty is making a grand tour from Daly City in Sunny California (home of the Cow Palace just south of San Fransico) to Buckhannon, West Virginia and then finally to my home in Overland Park, Kansas.Screen Shot 2017-01-24 at 6.10.20 PM.jpgScreen Shot 2017-01-24 at 6.38.00 PM.png

WARNING:  IF YOU ARE A PURIST… Read no more today.

This little machine is going to travel about 3,550 miles before I ever get to touch it, and I can hardly wait.   The machine appears to have some wear to the decals, and some finish scuffing on the neck, and may need some foot pedal cable work.   It’s hard to see defects from the Ebay photographs.  My friend knows someone that is great at helping to give some TLC and hot rod old machines, and I hope to hire him!  Cleanup, Tune Up, Strip Down, and Refinish & Decal.  It reminds me of the scene in the Wizard of Oz before they have an audience!  I also plan to figure out how to restore the case, which is in less than stellar condition… Stay tuned.

s-l16009.jpg

Can you imagine the fun we would all have if they made a reality show restoring and “hot rodding” vintage sewing machines!  I bet mechanics, machine artists and wild quilty ladies involved with all of the curvy, chromed machines of the past could be a hoot.  The machines would become showpieces of the future.  Computerized, plastic machine cases may never be collectible like the older machines.  They aren’t pretty, just very functional.  Once the circuit boards are aged, they may just take up space.  They don’t make sewing machines like they used to, and electronics are sometimes harder to repair.   Don’t get me wrong.  I love computerization.  But I am very psyched about my new, old toy!

I wish I could go to WV and help with the process of stripping it down and refinishing it.

Do you have a hot rod in your collection?
Comment and tell me about it.

Safe Travels!