

I’ve been following online posts regarding sewing room organization for a while. I recently upgraded my storage, but still hadn’t found a solution for storing my current projects, nor had I tackled the issue of
THE IRONING BOARD
I went out looking for rolling carts to store my baskets/bins of current projects. Lucky for me, the original solution I found was out of stock. That is when I looked at all of the wasted space under my ironing board, and decided I could upgrade my ironing station and create additional storage at the same time. I didn’t have to look far for inspiration. Someone on Pinterest had done something similar in their laundry room, but hadn’t changed it for a sewing space.
My new ironing station needed these characteristics:
Large rectangular board
capable of handling an unfolded width of standard fabric
no pointed end
Open Cubby Space
capable of fitting my favorite storage baskets
(Sterilite Baskets with Holes)
Reason?
If I can see the project I have started, I am more likely to work on it and FINSH IT!
Easily moved
Ability to change ironing covers
when they inevitably get dirty from adhesive or leaky irons!
MY SOLUTION
IKEA HACK
Kallax shelf unit with 4 doors, and casters
+
Custom removable iron board top
The Kallax shelf is 57 7/8″ wide when on its side. The height on casters is a few inches taller than I had my ironing board set, but makes a good counter height at about 35″ when on casters.
Now, for the fun part!
I took a pine board 17.25″ x 5′ long, and added some square dowels to frame out the top of the shelf. (If I did this again, I might make it wider – maybe 18 – 24″)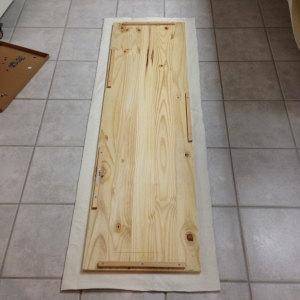
The ledge left around the shelf allows you an area to attach the batting to the board.
By framing a board to fit the top, the iron board will lift off easily for cover replacements when needed.
After the board was assembled, I placed it over two different batting layers. I used a cotton quilt batting next to the board, and a thermal fleece similar to Insul-Bright for the second layer.
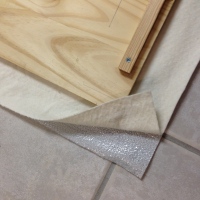
For the final layer, I used “Ironing Board Cover Silver” fabric from Jo-Anns, made of 100% cotton with an aluminized coating. Muslin and cotton fabrics are prettier, but I have found that these aluminized covers stand up to iron grime a little better and can be wiped down with a damp cloth to some extent.

I stapled the final layer tonight (because the elastic I had on hand wasn’t strong enough to fit the cover tightly).
It will work until I can make up some covers with drawstring!
The storage area underneath fit my project baskets perfectly and there is bonus storage behind doors for plenty of ironing and sewing supplies.
This sure beats a traditional board!

Thanks for the great idea and easy to follow directions! I need more storage space in my quilting area (who doesn’t?) and last week I got the idea that maybe I could find a cabinet with an ironing pad on top of it since most of the space an ironing board uses is wasted. Yay Google! I found your post on M*QC forum and it led me here. My friend put one together for me today . The ironing pad measures 20″ ×60″. I’ve ordered the IKEA baskets to put in the cubby holes. THANK YOU for this great idea!
LikeLike
Thank you for sharing that is a great idea. I hate to pull out my ironing board but if it was on rollers and I can store stuff in it would be great . thank you so much .
LikeLike
Genius! I made a big board (24 x 60) with plywood, cotton batting and a self stick silver coating. It stands behind a door and comes out to sit on top of my heavy vintage board when needed. Awkward. Your plan will let me get rid of the vintage board and a small bookcase that’s a disorganized catch all. Thank you!
LikeLike
I am so jealous!! (wink) (smile!) This is truly ingenious! I never thought that under your ironing board is wasted space. I thought I had covered everything, but you DID IT!! I’ve got to get one of these. Thanks for sharing!! We have Ikea in Atlanta and I always drive by but I never go inside. This will change as of TODAY!! Thanks again!!
LikeLike
Could you place a cutting mat in top of your ironing surface and used for cutting too, or would it be too “squishy” to cut on? Thanks; great idea!
LikeLike
The wool lays on top of a harder “standard” ironing surface. I have regularly put some of the small rotating cutting mats on both surfaces for cutting without any issues. However, the shelf isn’t as deep as most cutting mats, so you would just need to pick one that fits so it doesn’t hang off the edge. I’m also not sure how it would work on the single layer mats. The rotating mats have a little more support.
LikeLike
Love this idea but am wondering if you use this top for ironing shirts, pants, etc. My sewing room is too small to have both types.
Thanks. Diane
LikeLike
Hi Diane. Wow! You iron clothes? I try to avoid that! (Sort of kidding…). I have a wool top that I use for quilt blocks that fits the top. When I iron clothes, I just take the wool off. For shirts, I do recommend a sleeve board. Skirts are easier to do on a standard board with the tapered end, but not impossible on this. I love it. The extra storage and ability to do yardage easier outweighs the cons.
LikeLike
How did you attach the casters? Did you buy them at IKEA? Did you have to put a reinforced board on the bottom? I soooo need this in my life!
LikeLike
The casters can be purchased at IKEA. They are on rails.
LikeLike
I’m curious, why do you put the cotton batting under the Insol-bright and not Insol-bright next to the wood? I’ve got my plywood board ready to cover and I want to do it right. I was thinking of putting a first layer of aluminum foil as moisture barrier, Insol-bright, batting, then silver ironing fabric. Is the order important? Thanks.
LikeLike
I thought that the Insul-bright would act as a little bit of a moisture barrier, so I put it on top. Since I built the board, I added a felted wool pad across the top to give me very flat results when pressing quilt blocks. The felted wool comes in 60” widths by the yard, so it fit perfect on my board!
LikeLike
Where do you get the felted wool by the yard? I’ve been wanting to make one of these for a long time, and like you, wanted to make the top removable. Will you explain more how the IKEA casters with rails work? Thank you.
LikeLike
The caster sets are available at ikea to fit the shelves. Some drilling is required, but they attach easily. Sutherland Felt Company or Eco-felt both carry felted wool by the yard.
LikeLike
Which IKEA castors did you use? I love this idea. It’s exactly what I’ve been looking for.
LikeLike
I used what they used to call the “steel rail” variety. I honestly can’t find them on their website today, but did see them for sale on other sites. This is the part number I saw on Amazon’s Ikea listing. 002.886.57
LikeLike
Love this idea! So functional AND it looks pretty and neat! The square dowels keep the top in place over the Ikea unit instead of sliding around – right? Ingenious! Thank you for these instructions, I think this is in my future. By the way, your iron looks amazing…what kind is it?
LikeLike
Thanks! I have been using it for years now. Yes, the square dowels keep the top in place. It is also removable so that it can easily be recovered when needed. The iron in my original photos was a Rowena Pro precision steam I think. It has also lasted nicely. It is the “steamiest” valentine gift that I have ever received! 🙂
LikeLike